Create and test User Flows in Azure AD B2C
Azure AD B2C Part 2

This is part 2 of a series covering Azure AD B2C features. In this post, I explain steps to create and test a basic Sign-in, Sign-up user flow in Azure AD B2C tenant. With this user flow, you will be able to see in action user sign-up and sign-in to your app without writing the actual app yet.
You will need an Azure AD B2C tenant to follow the steps in this post. If not done already, follow part 1 of this series.
Register an application in AD B2C tenant
To do anything useful with your AD B2C tenant, you need to create an app registration inside the tenant. This app registration represents your actual app in the AD B2C. Once you have created an app regisration in your tenant, you can define various actions that your end user can do with your actual app. We will see that shortly. Let’s create an app registration first.
In the AD B2C tenant overview screen, click on App registrations and then click on New registration. Make sure you are using App registrations and not the Applications (Legacy). This may sound confusing as both names are similar. Naming is always hard!

On the App registration screen, you need to give your app a name. Yes, I know naming is hard (didn’t I say that?). To make it easier for you, the app name that you give here can be changed later as well. So, don’t worry and go ahead with some awesome name.
Supported account types
Supported account types is an interesting option to choose. Most commonly, it is the 3rd option that you will need (Accounts in any identity provider or organizational directory). What this means is that you can have end users using any identity provider including social identities such as Google, GitHub, Twitter etc. With this option, you can also allow your internal users (members of your active directory) to allow accessing your application.
With the first option (Accounts in this organizational directory only), you restrict your application to your internal users only who are members of your active directory. This is useful for having a separate app for administration of users or such activities which you do not want to expose to end users.
The second option (Accounts in any organizational directory) is slightly more inclusive than the first one. It allows users from various active directories to use your app but it does not allow to use identities from other identity providers. As Microsoft also says, this is the least commonly used option.
If all this still does not make sense, it will click at some point when you get more hands on with the AD B2C. For now, select the third option as shown below.
Redirect URI
When a user authenticates with Azure AD B2C, the authentication is passed to your app via a JWT (Json Web Token). The redirect URI is where AD B2C will pass the JWT. This is usually a real URI of your application, for example a dashboard that you want to show to the users when they complete the login to your app. For now, we will use a URI as https://jwt.ms. This URI is a JWT decoder web app provided by Microsoft. We will be able to see the JWT and decode the data that it contains on this web app when a user signs in or signs up with our app.
Select “Web” as the type and enter https://jwt.ms in the URI box.
OpenID grants
You also need to tick the box for granting admin access to openid and offline_access permissions. This is part of implementation of the OpenID Connect in Microsoft identity platform. For this post, we do not need to get into details of OpenID but in a nutshell, this allows the application to access protected resourceson behalf of the signed in user. You can read more about OpenID implementation in Microsoft identity here.

Click on Register and you should see your awesome application being represented in Azure AD B2C tenant as below.

Authentication tokens
We need to cnofigure our app registration to enable it to return required tokens (JWT) to our actual app. With that token, our app code will be able to know who the user is accessing the application. This user information may be then used to implement user level authorization or offer a personalized experience to the users. For example, you may want only admin level users to see other user’s information or some other protected resouces. You may also store the user’s preferred langauge or a colour theme in your app and when the user logs in, you can have your app switch to the preferred language or colour theme (Yeah I do hear you saying a Dark theme!).
Go back to the app registrations in your tenant and click on Authentication in the left side tab. Scroll down a bit and select checkbox Access Tokens under the Implicit grant and hybrid flows. This will make AD B2C return the access tokens to our app which we can investigate in the https://jwt.ms web app. Note that we are using the redirect URI as https://jwt.ms only for testing. In real world, it will be your application’s URI.

Create a Sign-up / Sign-in user flows a.k.a. policies
We now have created a registration for our app inside Azure AD B2C and configured it to return access tokens to an endpoint https://jwt.ms. Next, we will create user flows and test them using the app we registered. We do not need to write any code at this moment.
A user flow also called as a policy is basically some operation that an end user can perform with your app. The operation can be simply signing up to your app as a new user, signing in as an existing user, editing the user’s information, sign-out from the app and so on. So why do we need to create the user flows in the AD B2C and why can’t we do it in our app directly? The answer is that Azure AD B2C manages all users and their information. All such operations as Sign-in, Sign-out are done by the AD B2C on behalf of the user. Microsoft provides all the UI and pages for these operations. Your app only needs to point to these flows for various operations. This makes it a lot easier for you to focus on your app’s business logic rather than writing all the code yourself.
Azure AD B2C supports a number of user flows. At a bare minimum, you will need a sign-in flow for your app to let the users login to your app. A key feature of AD B2C is that users can self provision their accounts rather than having an admin user do it for them. Accordingly, it supports a flow called as Sign-up / Sign-in flow. Let’s use that flow to test our app.
In the Azure AD B2C overview page, click on User flows in the left hand tab and then click on to create a New user flow.

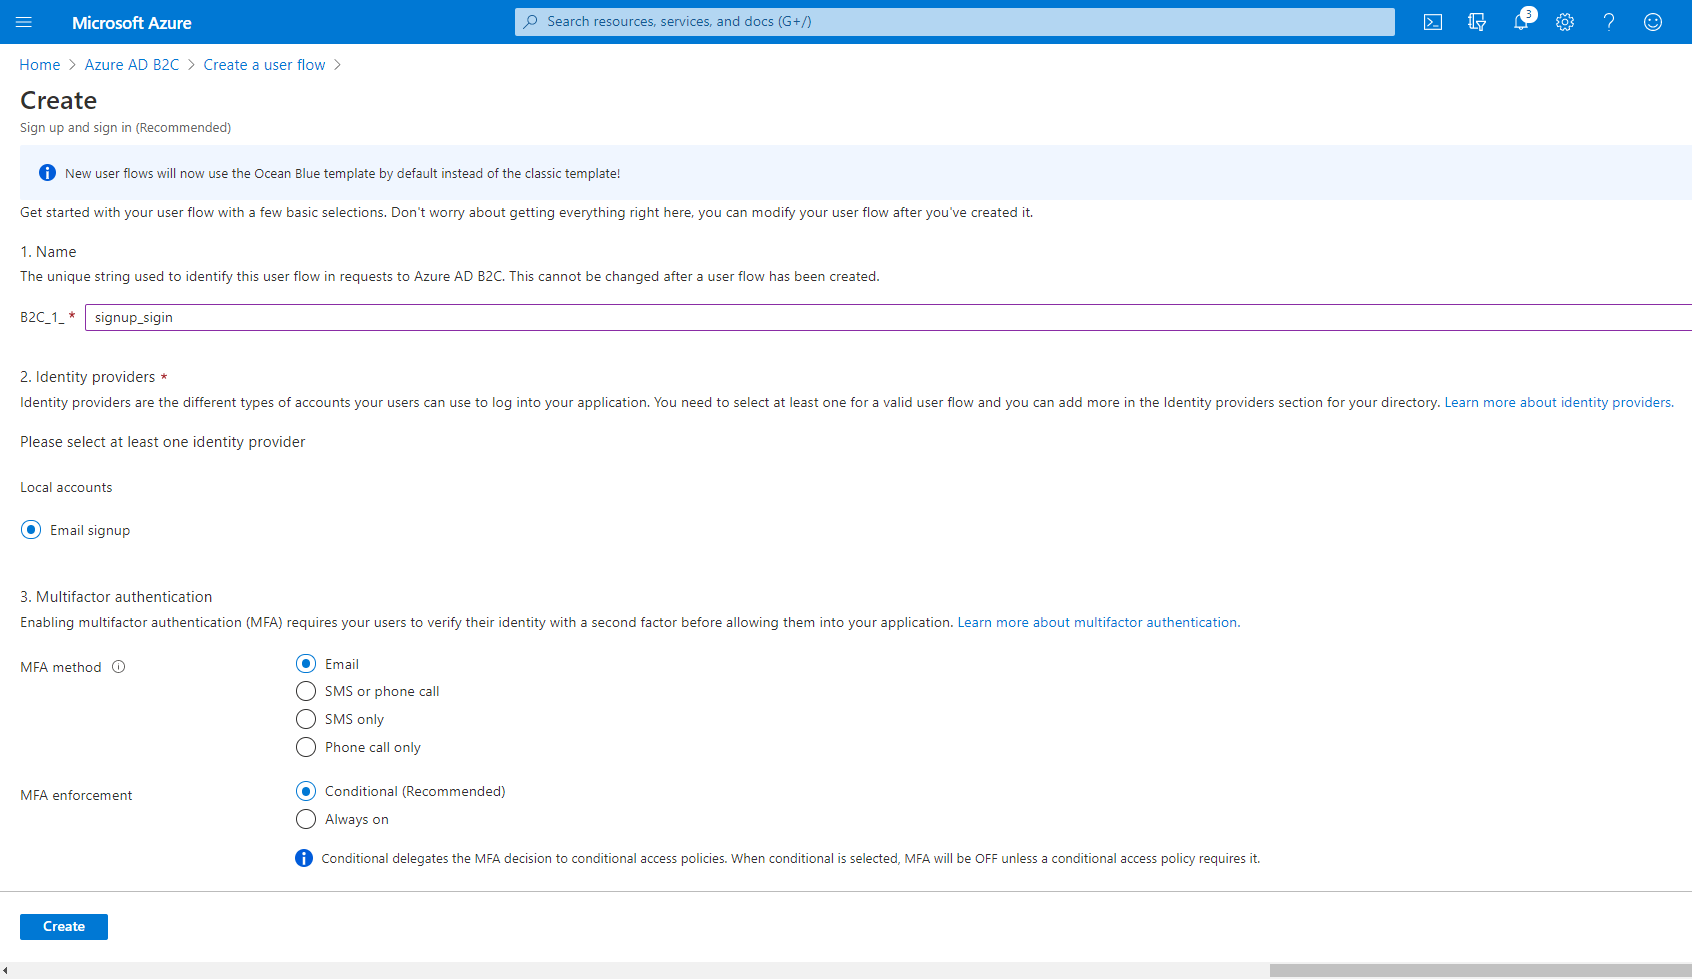
On the next screen, select Sign up or sign in user flow and select the Recommended version. The Recommended version is the latest version of this user flow and is recommended by Microsoft for all new applications. Click on Create.

Give some name to this flow, preferably indicating the flow.
Select option Email signup. We have not yet configured any other identity providers so we will use the default Email signup option. With this, we are allowing end users to create a new account in our tenant using their email address (and password of course!).
Leave the MFA options to their default values. MFA - Multi Factor Authentication is a way to authenticate the user by more than one means. When we select MFA method as Email, it will send an additional access / OTP code to the email address of the user trying to sign-up / sign-in to our app. It can be annoying for users to put in the code every time they want to sign-in so AD B2C provides a conditional MFA enforcement. With that option selected, the one time access code is sent only if With a conditional MFA enforcement, AD B2C will smartly identify risky sign-ins based on conditional access policies. Well yes that is a topic for another blog post so for now leave the setting to its default value.
Scroll down little bit and then select a few attributes and application claims. In this case, I selected City and Given name.
User attributes are the values collected from the user when they sign-up to your application. AD B2C stores all these attributes per user. When the user signs in to the app, it will return these attributes as claims in the JWT returned to the app. These all are optional but can help you personalize the user experience. For example, if you collect the user’s city and then when that user signs in, you can display weather information for that city.

You should see your user flow created as shown in the image below.

Test your User Flow
Now that an application is registered, user flow created, it is time to test the user experience.
Click on Run user flow in the user flow that you just created. It should pop-up with a small window on right side allowing you to select some options. In our case we have only one app and one redirect URI so as such there is not much to choose.
A user flow can be reused acorss multiple applications.As you can see in the screen below you can choose an application when you are running the user flow.

Once you click on Run user flow button in the popup, it will open a sign-in screen in a new browser tab.

Since this is the first time you are using this app, sign up to create a user account. Enter a valid mail address and click on Send verification code. You will get a verification code on the mail to verify the mail address. Notice that it asks you to fill in data for City and Given name. If you remember, we chose these fields as collection attributes.

Enter the code in the verification box and a password.Enter your city and name as well and click on Create button. AD B2C will now redirect you to your redirect endpoint. In this case, we have used jwt.ms as our redirect URI for testing. AD B2C will pass on the JWT for this user to the endpoint.
The JWT shows user details and also contains the claims and their values. You will see the city and name you entered as claims.


Summary
If you have read it this far and followed along, Congratulations! I appreciate that this was a long post but hopefully it was helpful in getting a basic hands on with Azure AD B2C. In the next post, I will cover how to use this setup in an actual web app and access a backend API from the app. Stay tuned!
Thank you for reading. If you liked this post, please share on social media using the links below. If you have any feedback, please send me a DM on Twitter. Keep learning!